Batch resizing multiple images in Photoshop CS5 is a very easy task . Photoshop has an built in image processing script for this purpose . With the help of this script we can easily convert and resize multiple images to smaller sizes . These resized images would be small is resolution and in storage size , which would be very convenient to upload onto the internet .
This method of resizing photographs can be very useful when it comes to resizing a lot of photographs at once . Photographs from birthdays , marriages and vacations can be fun to click but when it comes to sorting the good ones , its a tedious and time taking process .Further if you have a slow internet connection , uploading these photos onto the internet would be another challenge . This is where batch image resizing comes into help . You can follow the instructions below and learn to batch resize multiple images in Adobe Photoshop CS5 .
Note: Please organise all the photographs in a single folder , before you process with the instructions .
Instructions to Resize multiple / batch images in Photoshop CS5
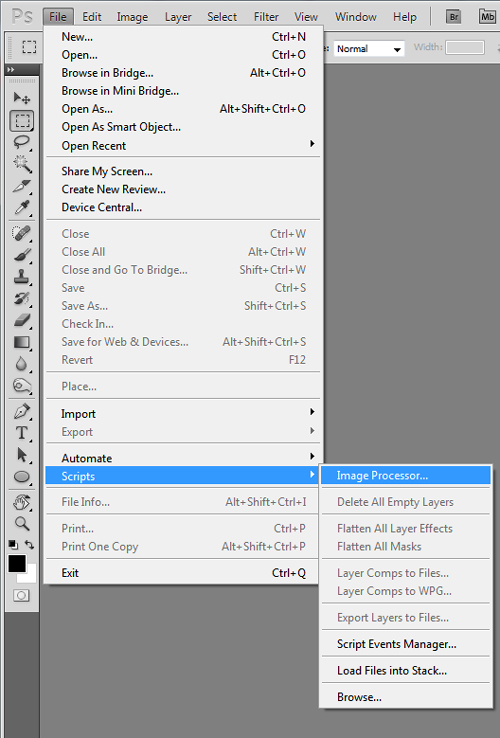
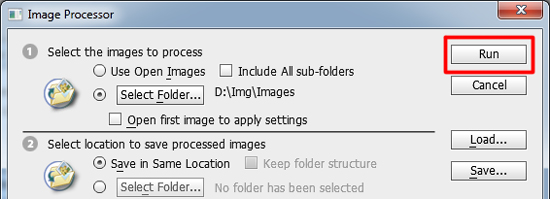
- Step 1: From Photoshop menu bar , select File > Scripts > Image processor .
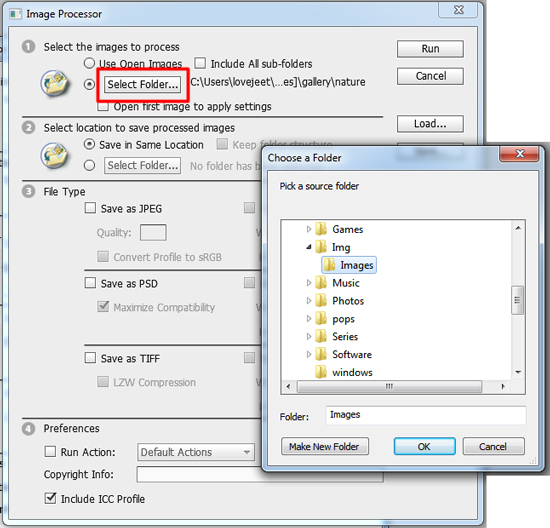
- Step 2: There are two methods by which you can convert and resize multiple images in Photoshop . you can either select “ use open images “ and use images already opened in Photoshop and resize them or select “select folder “ and select an entire folder to resize all the images in it . We are going to select an entire folder with images and resize them . From the dialog box click on ” select a folder ” and select the folder with the images you intent to resize .
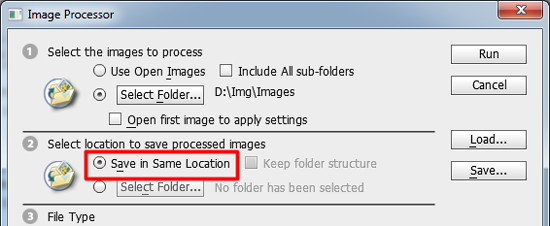
- Step 3: Select a location to save the output images . If you select “ Save in same location “ , Photoshop will save all the resized images in a separate subfolder with the original images . If you want to save the resized images in another folder , Click on ” Select folder ” to select a different folder .
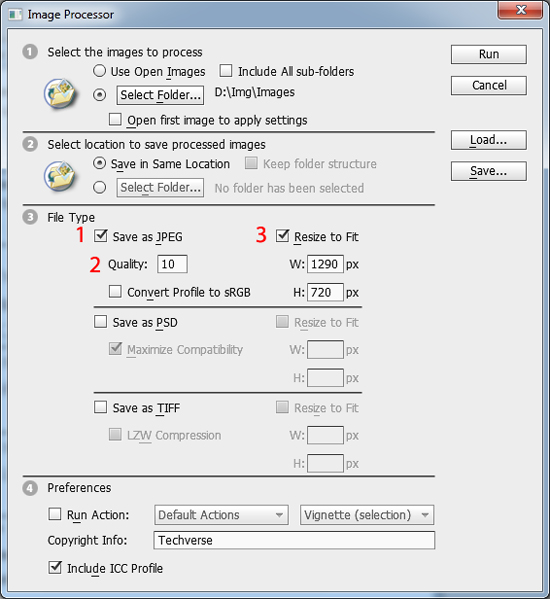
- Step 4 : Specify the following details for the images to be resized .
- Output format : There are three options to save the output images files , you can either save them in Jpeg , PSD or tiff file formats . Check Jpg to resize and convert all the images into Jpg format .
- Quality : Specify a quality value from 0 to 12 . A lower value will reduce the image size and quality and a higher value will do the opposite .
- Resolution : Check “ Resize to fit “ and set a output resolution for the images to be resized or leave it unchecked for the images to maintain their original resolution .
- Step 5 : Check the “Include ICC profile “ and type in your name in Copyright info . You can now click on Run to start resizing the images . Photoshop will now individually resize open and resize all the images and according to format type of the images it might take a few seconds or more to complete .
- Step 6: Once the batch resizing is completed , your images will be saved in a subfolder named “Jpeg” with the original images .
Now you can view the images and upload them to any website you would like .


can i resize and also put the resized image on a white background? like i need my images resized to fit on a 375 x 375 white background, but the image itself is not perfectly square, so i need a whole folder of them sized down to fit within that white background. does that make sense?
Hi thanks as Your technique saved a lot of time
Thank you 😀
Thank you sooooooo MUCH!!! You have no idea how easy it was to understand your directions. You were very very very thorough! Thank you again! 🙂
you can not believe how you made my life easier with this post 😀
Thanks
Thank you SOOO Much!